Installing a tankless water heater: a step-by-step guide
and live on Freeview channel 276
Tankless water heaters, also known as on-demand water heaters, provide hot water as needed, making them energy-efficient and space-saving. In this guide, we'll walk you through the process of installing water heater tank.
What You'll Need
Before you begin, gather the necessary tools and materials:

- Tankless Water Heater: Choose the right size and type for your home's hot water needs.
- Gas Line (if applicable): For gas-powered tankless heaters, ensure you have the correct gas line size and compatible fittings.
- Venting Kit (if applicable): Venting kits are needed for indoor gas tankless water heaters.
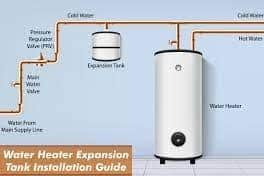
- Water Shut-off Valves: You'll need both cold and hot water shut-off valves.
- Pipes and Fittings: Depending on your plumbing, you might need pipes and fittings.
- Electric Wiring and Breaker (if applicable): Electric tankless heaters require proper wiring and a dedicated breaker.
- T&P Relief Valve: A temperature and pressure relief valve is a safety requirement.
- Pipe Insulation and Teflon Tape: Insulate pipes and use Teflon tape for sealing threads.
- Screws and Anchors: For securing the unit and other components.
- Pipe Cutter and Wrenches: Tools for cutting and connecting pipes.
- Drill and Bits: For mounting the unit securely.
Step 1: Choose the Location
Select a suitable location for your tankless water heater. It should be near the main water supply and close to the electrical or gas connection. Make sure it's well-ventilated and offers easy access for maintenance.
Advertisement
Hide AdAdvertisement
Hide AdStep 2: Turn Off Utilities
Before you begin any work, shut off the water, gas, and electricity to your existing water heater. If you're replacing a traditional water heater, drain it completely.
Step 3: Mount the Unit
Secure the tankless water heater to the wall using the provided mounting brackets and anchors. Ensure it's level and stable.
Step 4: Connect Water Lines
Connect the cold water supply line to the inlet and the hot water line to the outlet on the unit. Use shut-off valves on both lines for easy maintenance and repairs.
Step 5: Venting (for Gas Heaters)
If you have a gas tankless water heater, install the venting kit according to the manufacturer's instructions. Proper venting is essential for safety and efficient operation.
Advertisement
Hide AdAdvertisement
Hide AdStep 6: Gas and Electric Connections
For gas tankless water heaters, connect the gas line to the unit, ensuring a secure fit with the appropriate fittings. If you have an electric unit, connect the wiring to the dedicated breaker and follow the electrical code.
Step 7: Pressure Relief Valve
Install the temperature and pressure relief (T&P) valve on the hot water outlet. Run a discharge line from the T&P valve to a suitable drain or outside.
Step 8: Pipe Insulation and Sealing
Insulate the hot water pipe to prevent heat loss. Use Teflon tape on threaded connections to prevent leaks.
Step 9: Turn On Utilities
Turn on the water supply, gas, or electricity to the tankless water heater. Check for any leaks, and ensure the unit is functioning correctly.
Advertisement
Hide AdAdvertisement
Hide AdStep 10: Set the Temperature
Adjust the temperature settings on your tankless water heater to your desired hot water temperature. Most units have user-friendly controls.
Step 11: Test the Water Heater
Turn on hot water taps in your home to ensure the unit is delivering hot water as expected. Check for any fluctuations in temperature.